|
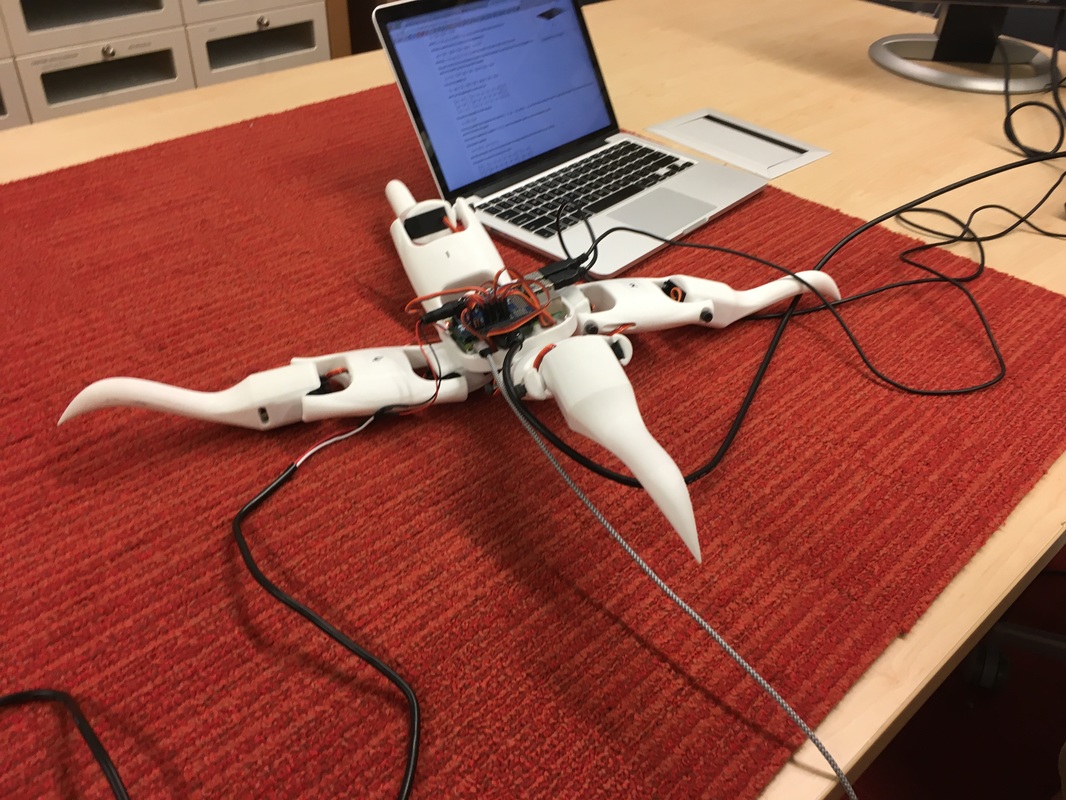
Spyndra is our newest open-source quadruped robot platform. It has eight motors, an IMU, and runs Raspberry-PI 3. It requires non-intuitive motor commands in order to locomote, and thus provides an interesting challenge for gait learning algorithms, such as those frequently developed in the Evolutionary Computation and Artificial Life communities.
|
|
cost
This open-source robot is composed of off-the-shelf motors and 3D-printed parts, enabling anyone to construct this robot for under $800 in parts plus printing material. We hope other research teams will modify its design according to their scientific needs.
Servo motors are the biggest cost driver of Project Spyndra. We use metal geared high torque servos as they tend to last longer and endure more aggressive dynamics. It is entirely possible to build Spyndra with lower cost servos, at the expense of accelerations and servo lifetime. Since standard sized servos have widely varying torque specs, we do not recommend mixing and matching different servos on Spyndra.
Servo motors are the biggest cost driver of Project Spyndra. We use metal geared high torque servos as they tend to last longer and endure more aggressive dynamics. It is entirely possible to build Spyndra with lower cost servos, at the expense of accelerations and servo lifetime. Since standard sized servos have widely varying torque specs, we do not recommend mixing and matching different servos on Spyndra.


Bill of materials
1 x Raspberry Pi 3 ($35.95)
1 x Servo Hat for Raspberry Pi ($17.50)
1 x 4 GB MicroSD Card ($6.30)
8 x Servo Motors, Metal Gears (<$500.00)**
8 x Steel Shoulder Screws ($7.28)
8 x Ultra-Low Friction Sleeve Bearings ($33.36)
8 x Heat-Set Inserts for Plastics ($12.21)
8 x Standard Aluminum Servo Horn ($87.04)
1 x LiPo Battery for Motors ($30.99)
1 x Adafruit IMU Breakout Board ($34.95)
1 x Li-Ion Battery Charger ($19.95)*
1 x Li-Ion Battery Pack for Raspberry Pi ($29.50)*
1 x On/Off Pushbutton Switch ($1.50)*
1 x 10x17 mm 470 uF 35V Electrolytic Capacitor (Comes in pack of 50) ($5.77)*
Approximtely 2 Kg of printing material - ABS or PLA ($70)
Optional:
1 x Camera for Raspberry Pi ($39.95)
Recommended items for ease of assembly:
1 x LiPo Battery Monitor Alarm Tester Checker ($7.99)
1 x Electrical Connection Kit ($13.99)
1 x Large Headphone Plugs to act as shoes ($7.95)
* Necessary only if operating Spyndra untethered to a power source
** Other servo options of same dimensions can be substituted: must accept 7.4 Volts, recommend digital servos with metal gears and 24 teeth C1 spline horn attachment.
STL files
1 x Chassis Cover (3D Printed)
1 x Chassis (3D Printed)
4 x Tibia (3D Printed)
4 x Femur (3D Printed)
See suggested printing orientation and settings
1 x Chassis (3D Printed)
4 x Tibia (3D Printed)
4 x Femur (3D Printed)
See suggested printing orientation and settings
CAD FILES
Assembly Instructions
Raspberry Pi Software setup instructions
Connecting Raspberry Pi to Monitor, Mouse and Keyboard
- Download NOOBS (offline and network install version)
- Insert a 4 GB (or larger) MicroSD Card into your computer
- Format MicroSD Card with formatting tools downloaded from the SD Association's website.
- Click here for Windows download
- Open the Application you have just installed
- Set "FORMAT SIZE ADJUSTMENT" to ON in the Options menu.
- Make sure you have selected the Drive your SD Card is inserted in
- Click "Format"
- Click here for Mac download.
- Select "Overwrite format"
- Make sure you have selected your SD Card, and not something else
- Click "Format"
- For more step by step info regarding Windows vs Mac format instructions, click here.
- Plug formatted MicroSD Card into Raspberry Pi
- Power Raspberry Pi by connecting to power source with a MicroUSB cable (i.e. computer)
- Connect to keyboard with USB cable
- Connect to mouse with USB cable
- Connect to monitor with HDMI cable
Software Instructions - Driver Installer
https://github.com/Yonahel/SpyndraInstalling a Python driver to allow user to move motors with pwm commands:
pwm.send_pulse(3, 250)
Once the driver is installed control software for Spyndra can be found here: https://github.com/Yonahel/Spyndra
- Enable I2C. Click the Raspberry Pi menu on the top left -> Preferences -> Raspberry Pi Configuration. Go to the 'Interfaces' tab and enable I2C. You may have to reboot(?)
- Download driver_installer.sh
- Navigate to it in the terminal, and enter 'chmod +x driver_installer.sh'. Now you can install it by typing 'sudo ./driver_installer.sh'.
- You're all set! To move the leg on channel 3 to a rotation 250:
- Open python by entering 'python' into the terminal and enter the following:
pwm.send_pulse(3, 250)
Once the driver is installed control software for Spyndra can be found here: https://github.com/Yonahel/Spyndra
learn more |
https://github.com/Yonahel/Spyndra
|
Project participants |
Joni Mici, Julian Oks, Christie Capper, Chad Tarpley, Ori Kedar, Jordi Orbay, Yonah Elorza, Julia Di, Hod Lipson
|
Related Publications |
|
